Understanding ISO: Mastering the Art of Light Sensitivity
Photography often requires balancing factors to get the perfect shot. ISO is crucial in this. It’s sometimes impossible to get the right aperture or shutter speed in low light. For example, you might need a large aperture to absorb more light. But, as evening sets in, the limited light forces you to choose a slower shutter speed. However, this can lead to a camera shake, resulting in blurry images. This is where ISO, or the International Standards Organisation, comes to the rescue. It controls the light sensitivity of your camera’s image sensor.
What is ISO?
ISO refers to the sensitivity of your camera’s sensor to light. Lower ISO values, like ISO 100 or 200, reduce the sensor’s light sensitivity. This produces high-quality images with little digital noise. Higher ISO values, like ISO 6400, increase light sensitivity. They allow shooting in darker conditions but increase digital noise. Modern digital cameras will enable you to adjust ISO settings in a short amount of time. This helps you adapt to changing light conditions.
For instance, imagine you’re photographing a cityscape at dusk. Using a low ISO like 100 might produce a crisp image, but you’d need a longer exposure time or a tripod to avoid blur. But, increasing the ISO to 800 or 1600 lets you hand-hold the camera. It captures the moment without needing extra equipment.

Practical Uses of ISO
Here are some practical tips for understanding ISO:
Most modern cameras, like the Nikon D5, have ISO ranges from 100 to 102,400. This lets photographers take great shots in extreme conditions. It’s usually best to use the lowest ISO. But high ISO can save the day in tough situations, like indoor sports or astrophotography.
Digital Noise: Understanding Types and Causes
You can liken digital noise to the hiss you hear when you turn up the volume on a sound system too high. Increasing ISO amplifies the sensor’s signals. This can cause noise in your photos.
Types of Digital Noise:
- Luminance Noise: This appears as grain in your image and affects the texture of the photo.
- Chroma Noise: This manifests as tiny, colorful speckles, often visible in shadow areas.
For example, a high-ISO photo of a starry night might show colorful dots in the dark parts of the sky. Cameras with larger sensors, like full-frame models, usually create less noise. This happens because there’s more space between the pixels. , compact cameras with smaller sensors are more prone to noise.
Minimizing Digital Noise:
White Balance: Getting Colors Right
Have you ever downloaded a photo, only to find the colors unnatural, with strange color casts? This is often due to incorrect white balance settings on your camera.
What is White Balance?
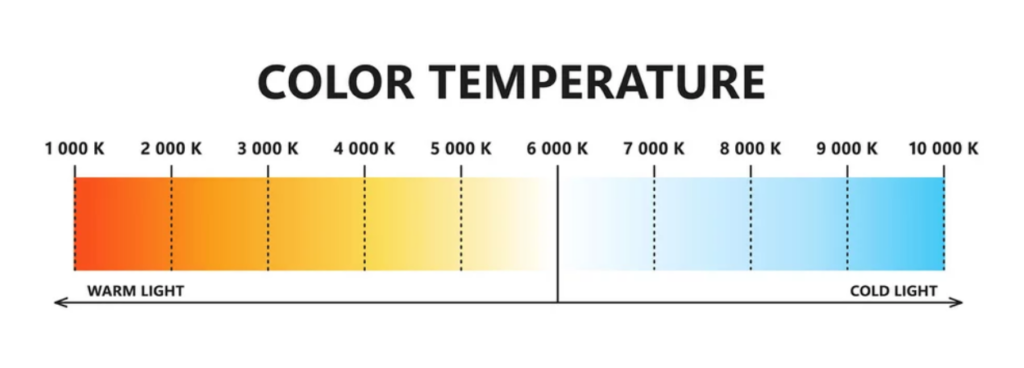
White balance makes colors in your photos look natural in different lights. Light has varying color temperatures, measured in Kelvin (K). For example:

Our eyes adjust to these changes. But, cameras need help to reproduce accurate colors. This is where the white balance comes in. It lets you adjust for the light’s color temperature.
Common White Balance Settings:
- Auto (AWB): The most popular choice. Modern cameras use advanced algorithms to estimate the correct white balance.
- Daylight: Ideal for shooting in natural light, typically set around 5,000–5,600 K.
- Cloudy: Warms up colors for overcast conditions (6,000–6,500 K).
- Shade: Adds warmth to colors in shaded areas, more so than in the cloudy setting.
- Tungsten: Adjusts for indoor lighting, reducing the yellow/orange cast.
- Fluorescent: Compensates for the greenish tint from fluorescent lights.
- Custom Preset: This helps underwater photography. It fixes the blue tones. Warm colors like red and orange fade with depth. Point your camera at a white or gray object. This will manually set the white balance. It will give more accurate colors.
Example:
When diving to 25 meters, you’ll notice that most colors shift to blue. A white balance preset can restore the natural vibrancy of coral reefs and marine life. It will make your underwater photos pop.

Final Thoughts
To take great photos in any light, you must master ISO and white balance. You can create sharper, more vibrant images with minimal effort. Understand how these settings work. These tools will elevate your photography. Use them for golden hour landscapes, night cityscapes, or the magic beneath the waves.
These concepts and techniques will help you control your images. They will bring your creative vision to life.